RailComms Wiki
Everything you need to run a busy SimSig panel by radio — answering drivers, calling them back, authorising moves, and handling emergencies. New to RailComms? Start at the top and work down.
Getting started
RailComms is a virtual railway radio for SimSig. Drivers call you with realistic AI voices over authentic radio static; you answer and reply by speaking. But it's fully two-way — you can also call any cab, authorise a train to pass a signal at danger or examine the line, broadcast an Emergency Group Call, and RailComms will drive SimSig's Train List to carry the moves out for you.
Requirements
- Windows 10 or 11. RailComms integrates with SimSig's native window; SimSig is Windows-only.
- SimSig with the gateway / remote control enabled.
- Internet for the best AI voices and speech recognition (offline voice fallbacks are included).
- A microphone for push-to-talk voice replies.
- A licence key to activate (see below).
Installing & activating
- Run the Windows installer you received after purchase.
- Launch RailComms.
- When prompted, paste your licence key — it looks like
RC-XXXX-XXXX-XXXX-XXXX. - Activation needs an internet connection. Once activated, RailComms keeps working offline and updates itself automatically.
One machine at a time
A licence runs on one machine at a time. You can move between PCs freely — close RailComms on one and the licence frees up within about 90 seconds, then activate on the other. It just won't run on two machines at once on the same key.
Connecting to SimSig
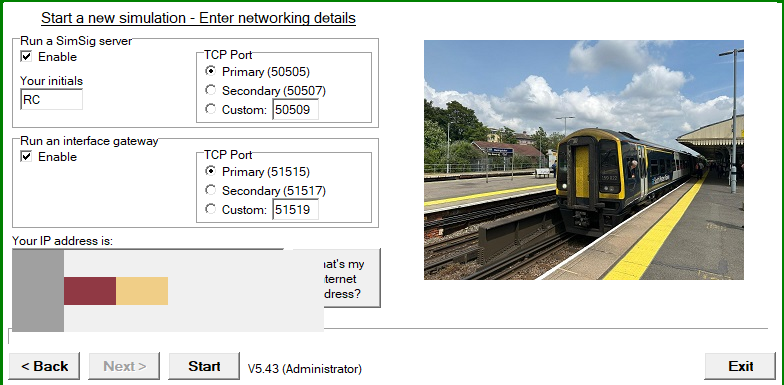
RailComms talks to SimSig over its network interface. On the SimSig "Start a new simulation – Enter networking details" screen you must enable both of these — RailComms will not connect if either is left off:
Step by step
- Open SimSig and choose Start a new simulation.
- On the networking details screen, under Run a SimSig server, tick Enable and enter your initials (e.g.
RC). Leave the port on Primary. - Under Run an interface gateway, tick Enable. Leave the port on Primary.
- Click Start and load your simulation as normal.
- In RailComms, enter the same initials and click Connect. The status indicator turns green once connected.
Handling incoming calls
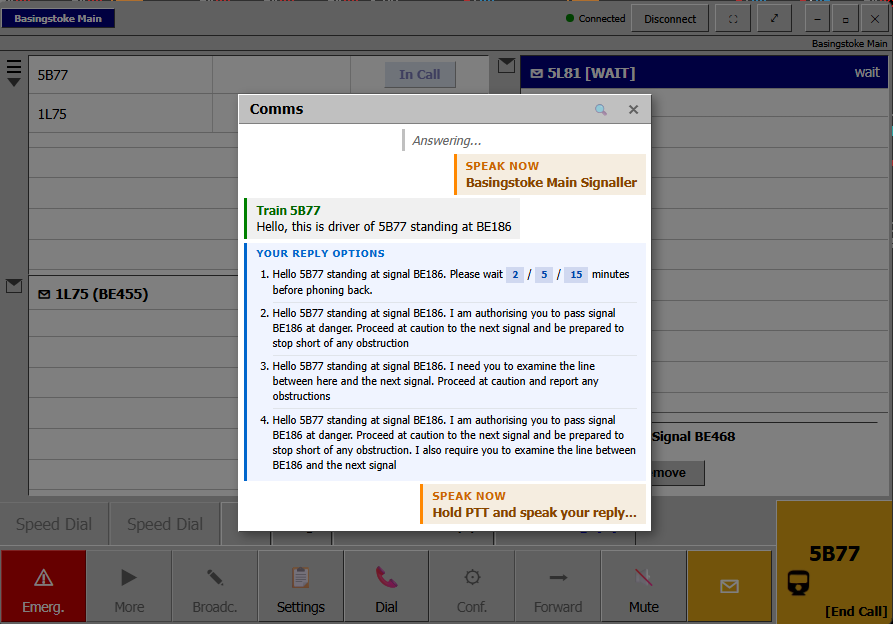
When a driver, signaller or shunter calls, you'll hear ringing and see the call appear. Click Answer — the caller speaks, with full railway radio FX for drivers and clean audio for office calls.
Replying
- By voice: hold the push-to-talk key (Left Ctrl by default) and speak. RailComms matches what you said to the right reply.
- By click: pick a reply option in the comms panel.
After your reply, RailComms voices the driver's readback and closes the call automatically — no manual hang-up needed. For calls where you authorise a move (pass at danger, examine the line…), RailComms goes on to action it in SimSig for you — see Authorising moves.
Making calls
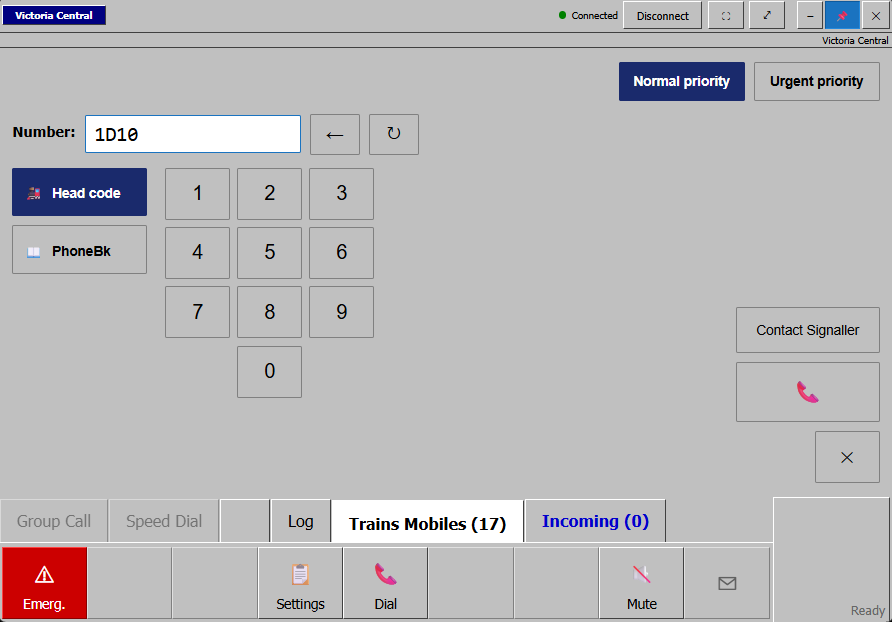
RailComms isn't just inbound. Press Dial on the toolbar (or Go to Dial Pad from the Trains Mobiles panel) to open the dial pad, styled after a real railway radio terminal. Enter a train's four-character headcode and choose Normal or Urgent priority.
Call any cab
The Call button (the pink phone) places an outgoing call to that train's driver. On Normal priority the driver only answers once stationary — if they're on the move it rings out, and they call you back the moment they next come to a stand. On Urgent priority the driver answers even while moving (an urgent call always means stop the train).
Contact Signaller
Contact Signaller asks the driver to call you. Because a driver won't take a call on the move, RailComms waits until the train has genuinely stopped and then rings you — so the conversation always happens at a stand.
Authorising moves
When you're speaking to a driver you can issue a signalling or movement instruction. Pick it by voice (hold PTT and say it) or by click. RailComms voices the instruction, the driver reads it back — and for the moves SimSig supports, RailComms drives SimSig's Train List to carry it out for you, no fiddling with menus.
- Pass signal at danger — authorise passing a red. SimSig confirms the train really is at a red signal; if it isn't, the driver tells you and calls back once they stop at one.
- Examine the line — proceed at caution and report any obstruction.
- Pass at danger & examine — both of the above together.
- Shunt forward / Reverse — move up to the next signal, or change ends and set back.
- Run non-stop — bypass the next booked station.
- Abandon timetable / Cancel crew change — route-control instructions applied to the train's timetable.
Emergencies & incidents
The red Emerg. tab is your incident toolkit. It's reachable at all times, even mid-call.
Emergency Group Call
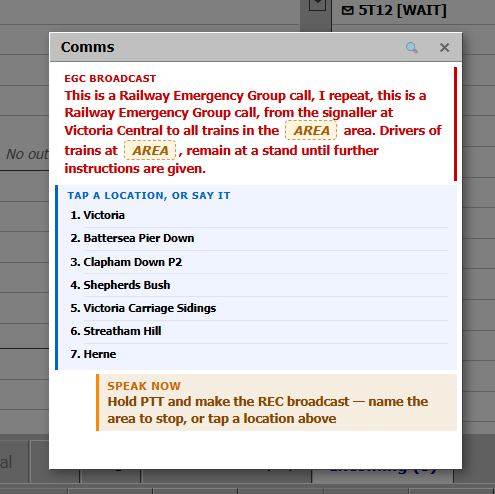
Press {panel} Stop All Trains to arm an emergency group call, then the ring button to place it. RailComms reads the trains in the area, you make the emergency broadcast by voice (or tap the location), confirm, and every train in that area is brought to a stand. Each one appears in the held-trains list as its driver reports stopped.
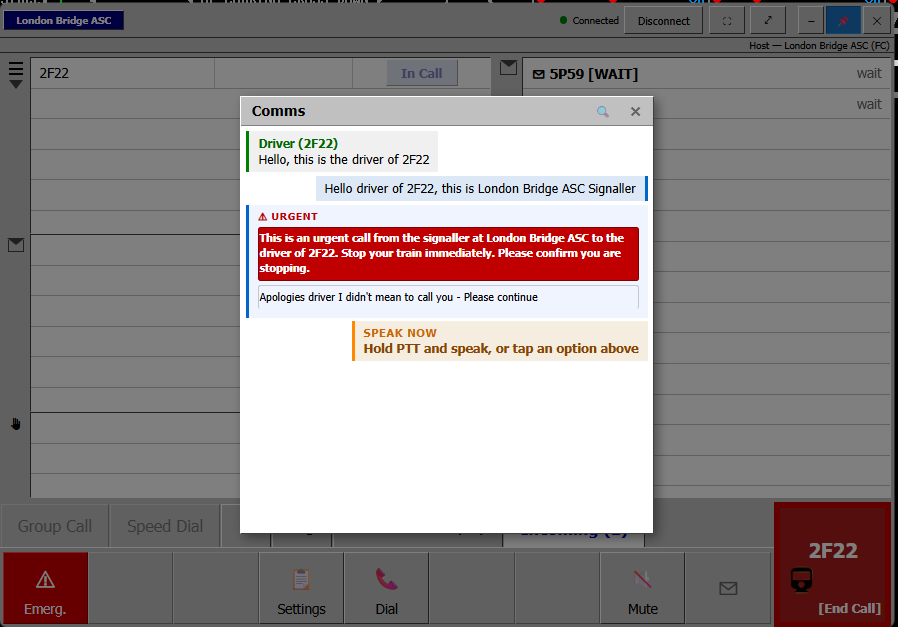
Urgent "stop your train" calls
Need to stop a single train fast? Dial it on Urgent priority — the driver answers even on the move and you tell them to stop immediately. Once held, you can call them back to remain at a stand or proceed at caution.
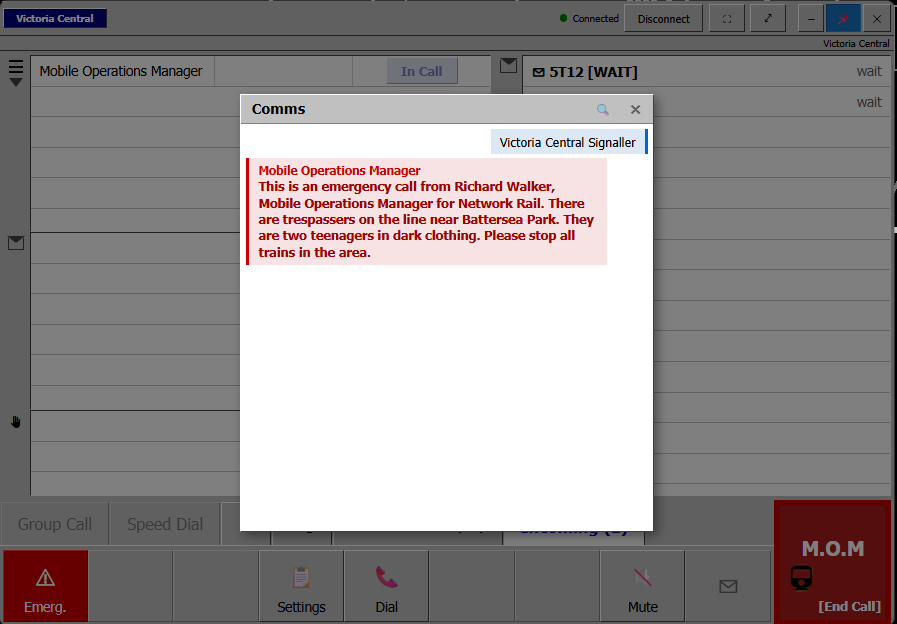
Simulated incident calls
Simulate Emergency Call rings you from Route Control, a Station Manager or a Mobile Operations Manager reporting an incident — trespassers or animals on the line at a real location where a train currently is. You acknowledge and stop trains in the area. Later, Simulate Follow-Up Call has the same person ring back to confirm the line is clear and normal running can resume.
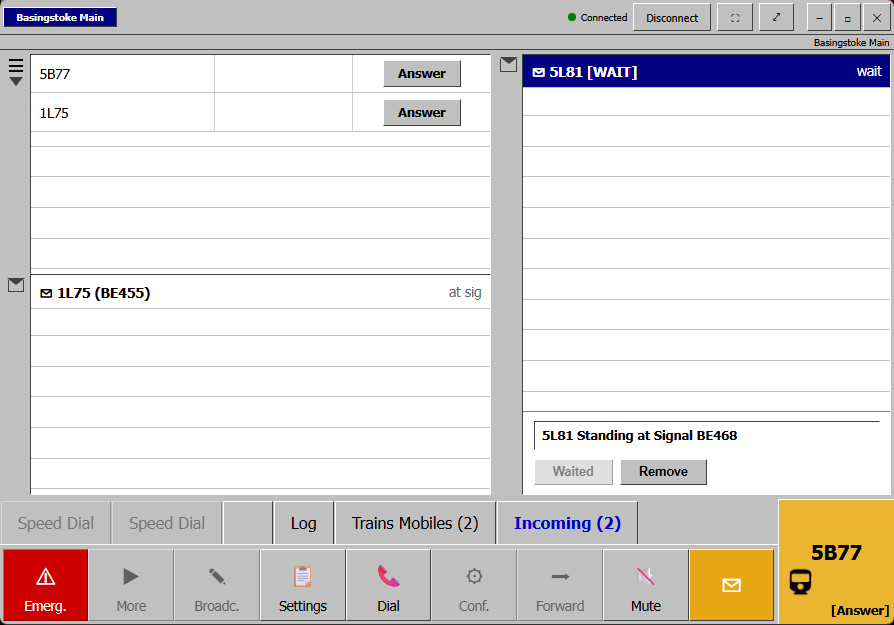
Alerts & auto-wait
Trains held at red signals are flagged in the alerts panel with a repeating notification. Select one and choose Wait to have RailComms answer the driver's next call for you and tell them to wait — you're not interrupted.
One-shot vs. indefinite
- One-shot (default): the wait fires once, then that train reaches you normally again.
- Indefinite (Settings → Auto-Wait): the train is held automatically on every call-back until it actually moves off the signal — set and forget.
Remove fully releases a train — the hold is cleared and it reaches you normally again. Track-circuit, signal and points failures are auto-detected from SimSig and listed here too.
Multiplayer
Running a multiplayer SimSig session? Every signaller with RailComms can call every other — real player-to-player voice over WebRTC, on the same LAN or across the internet via the cloud relay. Other players appear in the phonebook automatically; open PhoneBk from the dial pad and dial them.
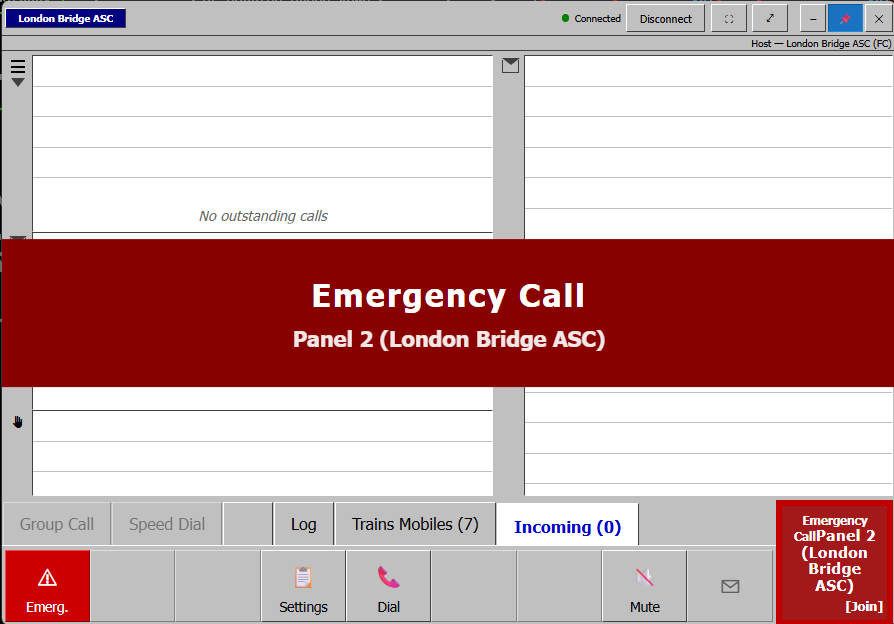
Emergency group calls are shared: when one panel raises one, adjacent signallers get the alert and can Join to hear the broadcast.
Browser remote & compact mode
Browser access is on by default. Open the URL shown in Settings from any device on your network — an iPad, tablet or another PC — and you get a live mirror of the panel: answer, reply, dial, alerts, the emergency tools and the message log. Audio always plays on the host PC.
Compact mode
Prefer to keep RailComms out of the way and work SimSig directly? Compact mode shrinks it to a slim bar docked bottom-right with just the essentials — Emergency, Dial, mute and a notification. It pops up automatically when a call comes in, then tucks away again.

Settings
Worth knowing about under Settings:
- Voice — provider and playback speed for the AI driver voices (16 voices across British, Indian, Irish and Australian accents).
- Push-to-talk key — the key you hold to speak (Left Ctrl by default).
- Microphone — pick your input device (USB streaming mics are supported).
- Auto-Wait — one-shot or indefinite hold (see Alerts & auto-wait).
- Your details — initials and panel name, used in call wording and multiplayer.
- Browser access — on/off and port for the remote.
- Mute SimSig — silence SimSig's own call sounds so only RailComms' audio plays.
Troubleshooting
"That key isn't recognised"
Check for typos and that you've entered the full RC-XXXX-XXXX-XXXX-XXXX key. Keys are case-insensitive.
"This key is in use on another device"
Close RailComms on the other machine and wait ~90 seconds, then try again.
Voices sound basic / robotic
The best voices stream from the cloud and need internet. Without a connection RailComms falls back to lower-quality offline voices — reconnect to restore the AI voices.
A driver command didn't happen in SimSig
Driver commands drive SimSig's Train List, which RailComms opens on demand. Keep the SimSig window accessible while a command runs and don't move the mouse — it takes a second or two. If SimSig rejects a "pass at danger" because the train isn't actually at a red signal, the driver will tell you and call back once they stop.
Can't reach another player in multiplayer
Make sure both players have RailComms connected to the same SimSig session. On a LAN, allow RailComms through the Windows firewall; over the internet, the cloud relay is used automatically.
Still stuck?
Email support@railcomms.co.uk.